Saturday, May 31, 2008
Titanic...in 5 seconds
Ladies and gentlemaen, I present to you, "TITANIC" in a nutshell....
Thursday, May 29, 2008
Silver, Grey and Black Smokey Eye Tutorial
The woman doing the tutorial is awesome!
Tuesday, May 27, 2008
Sonya's Garden
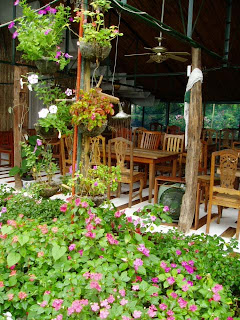
 One of my favorite spots in Sonya's Garden.
We first found out about this secret place in Tagaytay through my sister's in-laws. They brought us there for lunch, and the rest is history. We've been there countless of times bringing families and friends with us. The menu is simple and it never changes. At lunch time, the guests are served with Fresh Dalandan Juice, Salad with various add-ons and their famous Sonya's Dressing (which I tried to replicate, and succeeded!). The salad greens are fresh from their garden and it is an interesting mix, not your normal all-lettuce salad. This is followed by their Home-baked Bread served with Pesto, Kesong Puti, Veggies, Anchovies, Olive Pate, etc. You can mix and match these to suit your taste. Then, the pasta. It is served with two kinds of sauce you can choose from. My favorite is the Cream and Chicken. It is very rich and creamy, a little sweet and definitely filling. I normally add some sauteed shitake mushroom with it. The other sauce looks like it is tomato based. I think I only tried it once so I can't really be sure. They also serve Salmon Belly with the pasta. Yummy!!! The meal is topped off with a slice of Chocolate Cake, Banana Turon, Sweetened Kamote and Tarragon Tea.

 Sonya has a beautiful collection of plates. Unfortunately, they don't use them now because some of them got damaged.
One of the things I love most about Sonya's Garden is that on a sunny day, you can take really good pictures there. I love the natural lighting in their dining area. It makes everyone look good!
 A small garden inside the dining area.
Wednesday, May 21, 2008
Chicken Breasts with Sour Cream Gravy
This is a tried and true recipe that I've had for years. It doesn't take a genius to put it together and it is delicious. I always tinker with the ingredients; as far as I can remember I have never followed it completely because we just never seem to have all the ingredients. It always turns out wonderful anyway, so I'm not complaining. Here is the original recipe:
Serves 4

Ingredients:
1/4 teaspoon each cayenne pepper, black and white pepper, paprika, dry mustard
1/2 teaspoon each dried basil, garlic powder
4 boneless, skinless chicken breasts
2 tablespoons butter
2 green onions, chopped
1 1/2 cups chicken stock, heated
1 tablespoon cornstarch
3 tablespoons cold water
flour
salt
2 tablespoons sour cream
Directions:
1. In a small bowl, mix spices and herbs together. You can add more if you like to suit your taste. (Personally I only use black pepper and spanish paprika. I never measure them. I just eyeball it. And I use real mustard.) Dust the chicken breasts in spice mixture and dredge with flour.
2. Heat the butter in a medium saute pan. Put in the chicken and cook about 3-5 minutes each side. Do not overcook.
3. Take the chicken pieces out of the pan. Add the green onions in the pan and cook until soft. Pour in the chicken stock and add back the chicken. Let it simmer for about 10 minutes or until the chicken is cooked.
4. Remove the chicken and place on your serving plate.
5. Mix the cornstarch and water, stirring to make sure it doesn't stick to he bottom. Pour in the pan. Stir and cook until it becomes thick. (You can add more cornstarch if you need to. Remember, NEVER add cornstarch directly to the pan unless you want cornstarch blobs in your gravy. Always dissolve in cool water first.) Add in the sour cream. (I put more sour cream than the recipe calls for, about 5 tbsp.)
6. Pour the gravy over the chicken pieces and serve with a dollop of sour cream.

Enjoy!
Manila, Philippines
Monday, May 19, 2008
The Search is Over: The Chocolate Cake Recipe That Never Fails to Satisfy
Hershey's ® 'Perfectly Chocolate' Chocolate Cake
CAKE:
1 3/4 cups all-purpose flour
3/4 cup HERSHEY®'S Cocoa Powder
1 1/2 teaspoons baking powder
1 1/2 teaspoons baking soda
1 teaspoon salt
2 eggs
1 cup milk
1/2 cup vegetable oil
2 teaspoons vanilla extract
1 cup boiling water
1. Heat oven to 350 F. Grease two 9-inch round baking pans and cover bottom with parchment paper. This will make it easier for the cakes to come out later.
2. In a bowl, sift together the sugar, flour, cocoa, baking powder, baking soda and salt. In another bowl mix the eggs, milk, oil and vanilla. Add this to the dry ingredients and beat on medium speed of mixer until well incorporated. Stir in the boiling water. Equally divide the batter into prepared pans.
3. Bake 30 minutes. Then take a toothpick and insert in the middle of the cakes. It it comes out clean or has some cake crumbs clinging (not batter) it's done. If there batter bake 5 minutes more then test again. Do not overbake. Let cool 10 minutes then turn over carefully on wire racks.

After 30 minutes....
FROSTING:
1/2 cup unsalted butter
2/3 cup HERSHEY®'S Cocoa Powder
3 cups confectioners' sugar
1/3 cup milk
1 teaspoon vanilla extract
Tuesday, May 13, 2008
Olive Oil Scrub
I highly recommend this scrub. I was a bit apprehensive at first because I have oily skin and I thought this can only make my skin oilier. Wrong. You just need to get the right consistency of the scrub and you won't end up with an oily face.
I was also concerned about using sugar for my face. Sugar granules are a little rough. The last thing I want to do is irritate my face and get more acne. Well, I was wrong too. You can put the sugar in a blender to make it less coarse if you like. Beware that it does not become like powdered sugar, though. You don't want that. Just grin it a little so that it the granules are more fine but NOT powdered.
This scrub will leave your skin smooth, hydrated (not oily) and wonderful to the touch. You may want to give it a try. Here's the recipe:
(NO SUBSTITUTIONS, please. Don't use plain olive oil or, heaven forbid, vegetable oil.)
(I don't know if brown sugar will work. Please just stick to the recipe.)
(Any will do. Just make sure it's real honey. I found fake or watered-down honey in local supermarket in the area where I live. I think it's some honey plus sugar syrup. Don't buy that stuff.)
Combine all ingredients in a bowl and mix well.
It's ready to use.
You will find that this recipe makes a lot if you will only use it for your face. You can also use this as a body scrub, I have not tried it myself though. Save the rest of the scrub in a container with a lid. Don't refrigerate. It will harden the oil.
I hope the Olive Oil Scrub works for you!
XoXo plamea
Maybelline's Great Lash® Waterproof Mascara
Yeah, right.
This was the first mascara that I ever bought back in the days when I was still going through puberty and knew nothing about makeup. I read in so many reputable magazines that this is THE mascara to buy. A must-have. Here's my real-life experience with this product: It is so difficult to apply. It's almost guaranteed that your lashes will clump together like crazy. Granted, I am not a professional makeup artist and not very experienced in the art either. But I have used other mascaras (Estee Lauder at the present) and it's fine. Maybe it's my short and stubby asian lashes, I don't know. What I do know is that this won't make your lashes look great.
XoXo plamea
Watercolor Painting: "Gentleman in the Park"
Now that's done I want to show you what I painted a few days ago. (Time for show and tell.)

I forgot to take pictures before I started. I sketched this one I think a year ago. I painted the sky and that was it. Put it in my cabinet and forgot all about it until a few days ago.


I did not know how I was going to paint the tress on both sides. It didn't turn out too bad, I'm happy about it.

This is the picture I was trying to copy.


Painting the gentleman. The lower half of his body and his legs are in the shadows.I was trying to make it dark but I just couldn't do it right. So finally, I just let go and let my hand do the painting for me. Not bad.
When I paint I can't do a painting in one sitting. After some point I just have to get up and do something totally unrelated to painting or watercolors. I get bored I think. After awhile I go back and paint a little then leave again. Then go back and paint some more. It's a miracle I finish anything.

The ground looked like it was lacking something so I decided to paint it.

Finished! I'm pretty happy about it.
What do you think?


XoXo plamea
Mineral Makeup Series: Brushes

(From left-right: Blending/Eyeshadow Brush, Eyeshadow Brush, Large Concealer, Small Concealer/Eyeshadow, Spot Concealer, Blush/Bronzer, Flawless Face Brush, Grand Kabuki. I use that pouch, which is actually a pencil case, to hold my brushes when I travel.)
BLENDING/ EYESHADOW Brush

Bought this recently. This is good for blending your eyeshadow so there are no harsh lines and the colors mix well together.
EYESHADOW Brush

Bought this with the Blending Brush. I used it to apply the e/s wet....yeah, that was not a good idea. The bristles of this brush is soft and it's not very thick. This is better for applying e/s dry.
LARGE CONCEALER Brush

This came in a set. I use this to apply concealer on my undereye area. I think this will work well as an wet e/s applicator.
CONCEALER SMALL

The most used brush in my collection. I apply concealer wet because I find that it covers post-acne marks better this way. Just dip your brush in water, then squeeze dry. Pick up some mineral concealer and apply on your face.
SPOT CONCEALER

I have a lot of post-acne marks on my cheeks and jawline. This brush helps me to hide them. This also came with a set and to be honest, I'm not really sure what this brush is really for. But it works well as a spot concealer.
BLUSH Brush

Well, the name says it all. It's a brush for applying blush.
FLAWLESS FACE Brush

This is from OceanMist Cosmetics. It came with my mineral makeup set. I use this for applying foundation, blush, and mineral veil wet or dry. It's sort of an all-around brush.
GRAND KABUKI

My favorite brush. The hair is very soft and I love how it feels when you buff your face with it. I use this for foundation and mineral veil. it's wonderful for applying MMU wet. Just swirl foundation on your brush then spritz the brush with water or makeup fixative then buff on your face.
So, that my makeup brush collection for now!
XoXo plamea
Mineral Makeup Series: Mineral Makeup!
Why? For several reasons.
First, it makes me breakout. I don't understand how some people can wear any makeup brand, even the drugstore kinds, and still have gorgeous skin. It' not fair.
Second, I know as much about makeup-application/techniques as I know about brain surgery. Which is nothing.
Third, when I do try to put on makeup, I always end up looking ridiculous. You should have seen me try the smokey-eye technique. I could have been an extra in a horror movie.
Fourth, it takes such a long time. It would take less time for me to paint the London Bridge than to paint my face.
And that is why, I don't wear makeup. Then came along the Mineral Makeup.
One time my family and I were on a road trip and my sister tried the MMU (Mineral Make Up) on me. Wow. I became a believer. I love how it looks so natural. And it feels very light on your skin. In fact, it feels like you're not wearing makeup at all. Plus, and most importantly, IT DOES NOT MAKE ME BREAKOUT. Neither does it make my acne worse. I read somewhere that MMU actually helps heal acne and prevent it. I don't know about that but what I do know is that my face is not getting worse. Also, I noticed that MMU gives you that "airbrushed look" especially when applied wet. It also gives your skin a natural glow that other kinds of makeup cannot duplicate.
There are many different brands to choose from. There's Everyday Minerals, Ocean Mist, Bare Escentuals, Bare Minerals, Sheer Cover, Luminare, Ellena.....the list goes on and on. I recommend that you check out different brands to find "The One" for you. Before committing yourself to it, try samples first. They're very cheap, and sometimes free. This way you can test the waters first and see if MMU is for you. Oh and, one tip about buying foundation. It is very important, actually crucial, that you buy the shade that matches your skin tone perfectly. This is what gives you that all-natural, flawless, and fresh look. (I read in another blog that MMU is very forgiving so you can wear different shades of foundation. But still, it would be much better if you wear the shade that perfectly matches yours.)
If you want more information about Mineral Makeup, google it. You'll find tons of articles about it. Also, try watching videos on You Tube. I've seen some pretty good ones there about MMU --- application, reviews, techniques, etc.
If you've never tried Mineral Makeup before, you should. It could change your life.
(Or maybe not. But it will definitely change your face.)
UPDATE:
My Mineral Makeup. Yes, my collection is not extesive. I've been itching to buy some more but these mineral makeups last forever! Seriously. I've been using it for about 6 months now, almost everyday, and there's still a lot of it. Like half, maybe.

The brand I'm using is OceanMist.
Left to right, top to bottom: Mineral Veil in Lightly Tinted Mineral Finish, Foundation in Champagne and Sandstone, Light Mineral Concealer (waaay too light for me), Vanora Blush (love it!), Warmly Luminous Mineral Finish, Yellow corector, Brown eyeshadow and Carribean Reef eyeshadow.

Barenatural Ultmate Concealer, Peach blush from BareNaturals and Sunshine Yellow Concealer from StarMinerals.

Brushes, Mineral Makeups, Mixing dish, Spray bottle and a Pink Blush (not MMU).
XoXo plamea


